Monday, January 19, 2015
Tsu=uang
Join me on tsū, they are sharing social revenues with all of us #tsunation https://www.tsu.co/dedymaryadi
Wednesday, December 31, 2014
Wireless Roaming dengan WDS
Topologi
Ada lebih dari satu access point yang nantinya akan memancarkan wireless dengan SSID yang sama. Client bisa terkoneksi ke access point manapun, tergantung signal dari access point mana yang terdetct bagus di sisi client. Ketika client berpindah lokasi dan terputus dengan salah satu access point, client akan secara otomastis berpindah ke access point lain yang menjangkau client tersebut.

Static WDS
MikroTik memiliki fitur Dynamic WDS dan Static WDS. Biasanya dengan pertimbangan kestabilan koneksi, admin jaringan lebih memilih static WDS. Memang secara konfigurasi sedikit lebih rumit, namun koneksi tidak mudah berganti - ganti jika signal turun. Ketika koneksi antar repeter berpindah, koneksi biasanya akan putus kurang lebih dalam satu ping. Jika terlalu sering, maka akan muncul kesan koneksi seperti putus - putus. Maka dari itu, banyak yang memilih untuk mengimplementasikan static WDS. Artinya, kita tentukan ke access point mana repeater akan terkoneksi. Sehingga walaupun signal turun, koneksi tidak akan berpindah - pindah. Sebagai contoh, kita akan coba bangun implementasi static WDS dengan detail topologi seperti berikut. selenkapnya
Tuesday, March 6, 2012
Solar Power for Mikrotik
INTRODUCTION
THIS IS A WORK IN PROGRESS
THIS IS A LONG ARTICLE WITH LARGE IMAGES, PLEASE LET IT LOAD FULLY
The purpose of this Wiki article is to document the process and materials required to build a Hisite (Base Station) that will operate autonomously using RouterBoard Hardware, without any connection to the Grid or Municipal Power Supply.
Some reasons why this may be needed:
- There is no mains electricity supply where you are building your Hisite. Maybe this is because you are placing it on a mountain or hill in a remote area.
- The the mains electricity is unreliable where you are putting the hisite and you dont have any automatic generator, or grid connected inverter or UPS
- You have access to mains power, but find that solar power is often more stable for the RouterBoards, and you can get massive Uptimes and reduce issues.
- You dont want to pay money to the landlord that is hosting your Hisite, and besides you are an environmentally energy efficient organisation.
DISCLAIMER
First I must point out that I am not an electrician or Solar Power "Expert". The contents of this article is the result of my experiences and lessons learned. I may not have calculated things fully / correctly, and may not have designed things exactly how they should be. THEREFORE you are reminded of this and that the use of this information is made entirely at your own risk. If you damage some equipment or yourself, or you find that this desgin doesnt cover the loads that you have, I can take no responsibility.
REMEMBER working with power and batteries and heights can be dangerous. Observe all industry standard health and safety rules.
CALL TO GURU'S
Can I request that others who have had successes with Solar Power Installations please edit / review this wiki? If you dont have time to make changes you can PM me in the forums and I will make the edits.
AIM
To power the following equipment with the use of Solar Power and NO Mains Power. The system must operate 24x7x365 with no downtime due to power.
Equipment to be powered:
- 1 x RB433 Routerboard
- 1 x R52H MiniPCI Radio Card
The system must be installed at the base of the mast and send power (NOT OVER POE) up the mast to the RouterBoard Mounted in an Outdoor Housing at the top of the Mast.
Mast is 30 Meters High.
DESIGNING THE SYSTEM
PLANNING: INFORMATION GATHERING
There are quite a lot of variables when designing a solar power system. You must consider these things:
Sunlight
How many hours of useable sunlight in a day to you receive in your area. This is called Insolation. Obviously this varies during the year with the seasons and so you will have fewer useful hours of sunlight in winter months than in summer months. I recommend that you always use the LOWEST number for your area.
For example in Nairobi, Kenya (where I am) The annual average sunlight is 5.62 Kilowatt Hours per meter squared per day. During the summer months February has the highest levels of sunlight at 6.24 Kilowatt Hours per meter squared per day and July has the lowest at 4.88 Kilowatt Hours per meter squared per day.
Therefore when doing my calculations I must use the lowest number of 4.88 kWhours per day. This ensures that in the winter months my solar system can still charge up the batteries and keep the routerboard running properly during the dark/gloomy hours.
You can get the sunlight data for your area from many places on the net. I got mine from the NASA website
Power Consumption
The Power Consumption of your Hisite. This can be tricky to get right in my experience. Start by reading the user manual for your routerboard, and refer to the power consumption data in the specifications.
The RB433 Manual claims that the RB433 will consume approx. 3 Watts BEFORE you add any radio cards. Radio Cards power consumption varies according to the power output of the radio and other things.
System Voltage
The voltage that your equipment can use. The Routerboard Manual states the following:
"RouterBOARD 433 series boards are equipped with a reliable 25W onboard power supply with overvoltage protection. 12..28 V DC input voltages are accepted, but when powered over long cables, it is suggested to use at least 18V. The system is tested with 24V solar/wind/RV systems with 27.6 charge voltage. Overvoltage protection starts from about 30V (up to 60V), so the board will not be damaged if connected to a 48 or 60 V power line."
And so because Mikrotik say they tested with 24Volt Systems I based my system on 24 Volts.
There are other opinions on this in the Forums, and I have to admit I don't understand the science enough to really figure this out. Do your own checking.
Practicalities
The practicality of the system. Do you want many small panels, or one big one? Do you need many physically small batteries or fewer big ones?
Maybe if you have to carry the batteries up the mountain in your backpack then lots of smaller ones makes more sense.
You also have to balance your workings with what you can get. I am in Africa, and we cant always get the ideal items, and so you may have to adjust your design / calculations to suit what you can get.
PLANNING: THE CALCULATIONS
Size the Battery Bank
STEP 1:
Calculate the amp hours per day:
So: 144 Watt Hours per day / 24 Volts System = 6 Amp Hours per day
STEP 2:
Calculate the battery storage required. We want this system to have three days of storage (or autonomy) in case there is a wicked storm that comes in winter and reduces the charging ability of panel.
So: 6 Amp Hours Per day x 3 Days = 18 Amp Hours of battery storage required.
STEP 3:
Now we need to consider that we cant flatten the batteryś completely. Its bad for them, so to choose the right battery size we need to factor this in.
So: 18 Amp hours of storage required / 0.5 (For a 50% maximum discharge of the battery) = 36 Amp Hour Battery Required
STEP 4:
Round up the result attained in STEP 3 to the next battery size that you can get in your area. I chose a 44Amp Hour Battery as there was no option between the 20Amp Hour and the 44 AH. They didnt have a 36 AH battery.
Size the Panel
To calculate the size of the Solar Panel Array we need to work through the calculation in three steps.
STEP 1:
Calculate the watt hours per day.
We know our Routerboard is going to consume ~6 Watts of power, and we know that we are going to run it 24 Hours a day.
We now calculate the watt hours per day by multiplying the wats consumed by the number of hours of operation:
6 Watts x 24 Hours Operation = 144 Watt Hours
Then we must calculate the daily Amp Hours requirement for the system. We know in advance that we are choosing a 24Volt System.
So: 144 Watt Hours / 24 Volts = 6 Amp Hours Per Day
STEP 2:
Calculate the required current output from the solar panel in bright sunlight conditions in Amps
Things we know:
- It is generally accepted that batteries dont store 100% of the energy they are given, so we use a factor of 0.8 to account for inefficiencies.
- We know that we are calculating on the basis of 4.88 Sun hours per day
- We know that we need to provide for 6 Amp Hours Per Day
So: 6 Amp hours per day / 0.8 battery efficiency factor / 4.88 Sun hours per day = 1.54 Amps
This means we want a solar panel that gives about 1.54 Amps or more in bright sunny conditions.
STEP 3:
To Size the panel, we can now multiply the Amps needed by the volts of the system:
So: 1.54 Amps needed x 24 volts system = 36.96 Watts
So the Minimum wattage solar panel that you need is say a 40 Watt panel. Or you can take two 20 Watt panels and connect them in parrallel to increase the wattage to 40 Watts.
Results of the Calculations
So having worked through the calculations we know the following:
- We need a 40 Watt or larger Solar Panel
- We need a 36 Amp Hour or largery Solar Battery
Spreadsheet to make the calculations
PrvtPilot On the Forums made a Spreadsheet calculator to help with these calculations.
This is a Excel spreadsheet that will make all the calculations mentioned in the article. Just fill in the grey boxes with your numbers and the results will be displayed in the green boxes. Simple.
I tried to upload the file here, but .xls is banned by mediawiki. So you can find the file here:
THE FINISHED DESIGN
The following drawing shows how the components are connected:

BUILDING
KIT LIST
The List of equipment that I have used (Please note that costs are in US Dollars and apply to Kenya):
- 2 x 40 Watt 12 Volt Solar Panel @ 193 USD Each
- 1 x 24Volt 15Amp Charge / Load Controller @ 60 USD
- 2 x 12 Volt 44amp hour deep cycle, sealed lowe maintenance lead acid solar batteris @ 95 USD Each
- 30 Metres of 2.5mm Twin Core Flex Copper Cable @ 0.8 USD per Meter
- 10 Metres each of Red and Black 4mm Single Core Copper Cable (20m total) @ 1 USD Per MEter
- 1 x DC Power Plug (to go into the routerboard)
- 1 x ABB IP 55 Rated Outdoor steel housing to contain the batteries and controller @ 35 USD
- A DIY Steel Frame to mount the panel @ 20 USD
- Many Cable Ties
- Various cable lugs and terminators
SEQUENCE OF CONNECTION
Please observe these rules when connecting up your solar system to ensure that you dont damage any components.
Always make sure you connect the NEGATIVE cable FIRST when working with DC systems.
Always connect the battery first, then the Solar Panels and FINALLY the Load.
Follow the numbered sequencing as shown in the image below:

PHOTOS OF MY SYSTEM
THE TEST RIG
The photo below shows the system on test. Making sure that my calculations do actually work. As with all these things, BEFORE you put anything in to your production network make sure you TEST, TEST, TEST.
Also be sure to buy a good quality DIGITAL multimeter. You will use this tool to measure voltages, make sure you have things wired properly and to monitor your system as you test.

THE FINISHED SYSTEM
The Housing
You need a good strong housing that can hold the weight of the batteries safely, and that will provide weather resistance and yet still provide good ventilation for the batteries.
I had one made by a friend. Its a powder coated steel affair with good side vents.
Housing: 

Vents: 

The Back Plate
My housing came with a removable back plate that can be drilled and modified to allow you to mount any sort of equipment in the housing. I used mine to mount the Charge Controller, and the fusing system. You can mount anyhting else you like here. Maybe even a routerboard.
Here is my back plate showing the inline fuse on the flex cable to the battery, and the fuse panel for connecting loads (routerboards) to the system. Using the bus bar for the negative, and the fuse panel for the positive load connections means that it is easy to connect or disconnect loads. YOu can just remove a fuse to de-power something without having to get your screwdriver out and remove connections.
All connections are soldered.

Installed Backplate: 

The finished system ready for commissioning
Here it is in all its glory. Batteries installed in parrallel.
Now all we have to do is install the housing on the mast, connect the panels and loads and go for a beer!

UPDATE: 400 Days Uptime
Well, the proof is in the pudding as they say! Quite pleased with this project. We only rebooted it for a RouterOS upgrade.
The screenshot below shows 400 Days uptime on the RB433 with 1 radio for AP (R52H) and 1 Radio for backhaul (R52)

Sunday, November 20, 2011
Get Dynamic IP for Domains
This article is about getting Dynamic IP's for domains such as
youtube.com and facebook.com. This is useful when particular task is
needed to be done for such domain, tasks such as different route, QoS,
prioritization, etc.
The following example will be done for youtube.com and facebook.com. Also that this example assumes that local network IP Subnet is 10.10.0.0/16.
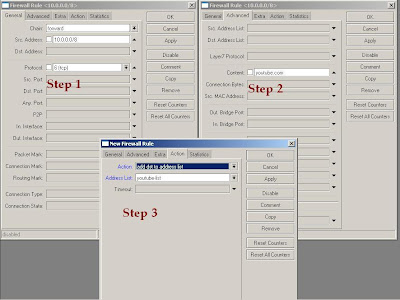
Create firewall rules to add each IP visited by users to a dynamic IP Address-List which can be used later.
Snapshot of how you will create firewall rules to add each IP visited by users to a dynamic IP Address-List which can be used later.
The same procedure that is shown in snapshot will be followed for content="facebook.com" and content="fbcdn.net", if wanted change address-list to different name such as "facebook-list".
Also make sure that these rules are added in FILTER table and not in MANGLE.
 wiki
wiki
The following example will be done for youtube.com and facebook.com. Also that this example assumes that local network IP Subnet is 10.10.0.0/16.
Create firewall rules to add each IP visited by users to a dynamic IP Address-List which can be used later.
/ ip firewall filter add chain=forward action=add-dst-to-address-list protocol=tcp
src-address=10.10.0.0/16 address-list=youtube-list address-list-timeout=0s
content=youtube.com comment="youtube.com IPs"
/ ip firewall filter add chain=forward action=add-dst-to-address-list protocol=tcp
src-address=10.10.0.0/16 address-list=facebook-list address-list-timeout=0s
content=facebook.com comment="facebook.com IPs"
/ ip firewall filter add chain=forward action=add-dst-to-address-list protocol=tcp
src-address=10.10.0.0/16 address-list=facebook-list address-list-timeout=0s
content=fbcdn.net comment="Facebooks content delivery network IPs"
Snapshot of how you will create firewall rules to add each IP visited by users to a dynamic IP Address-List which can be used later.
The same procedure that is shown in snapshot will be followed for content="facebook.com" and content="fbcdn.net", if wanted change address-list to different name such as "facebook-list".
Also make sure that these rules are added in FILTER table and not in MANGLE.

Friday, November 4, 2011
AP mikrotik
This article will show a very quick overview for beginners on setting up a Wireless Access Point in RouterOS Winbox graphical configuration tool.
Requirements
a router running RouterOS loaded with supported miniPCI wireless cards
a connection to the router via the Winbox utility
Instructions
Start by opening the Wireless Interface window in Winbox. You will see some wireless cards listed here, they might be disabled - to turn them on, click on the blue Enable button. Make sure that the interface is configured and the antennas are connected before you enable an interface.


Mikrotik - Wireless AP
Instructions
Start by opening the Wireless Interface window in Winbox. You will see some wireless cards listed here, they might be disabled - to turn them on, click on the blue Enable button. Make sure that the interface is configured and the antennas are connected before you enable an interface.wiki
Mikroti - Wireless AP Client
Configuration example shows how to establish simple wireless network by using MikroTik RouterOS. MikroTik RouterOS is fully compliant with IEEE802.11a/b/g/n standards, MikroTik RouterOS device can be used as wireless access-point and wireless station


Access Point Configuration
- Connect to the router via Winbox
- Setup Wireless interface, necessary configuration options are mode=ap-bridge band=ap_operated_band frequency=ap_operated_frequency ssid=network_identification

- These settings are enough to establish wireless connection, additionally you need to add IP address for the wireless interface for IP routing, optionally add security and other settings.
Station Configuration
- Wireless client configuration example is for MikroTik RouterOS, other vendor OS configuration should be looked in the appropriate documentation/forum/mailing list etc.
- Connect to the client router via the same way and proceed to the Wireless interface configuration.
- Necessary configuration options are mode=station band=band_ap_operates_on ssid=ap_network_ssid

- These settings are enough to establish wireless connection, additionally you need to set IP address for the wireless interface to establish IP routing communication with access point, optionally use security and other settings.
Additional Configuration
IP Configuration
- Add IP address to Access Point router, like 192.168.0.1/24

- Add IP address to Client router, address should be from the same subnet like 192.168.0.2/24

- Check IP communication by ping from station (for example),

Additional Access Point Configuration
- All the necessary settings for the simple Access Point are showed here.
- Security profiles are used for WPA/WPA2 protection, configuration options are explained here. Usually all wireless clients share the same security configuration as access point.
- mode=ap-bridge allows 2007 clients, max-station-count is used to limit the number of wireless client per Access Point. Wireless mode=bridge is used for point-to-point wireless links and allows connection for one station only.
- MikroTik RouterOS license level4 is minimum for mode=ap-bridge
- Other wireless settings are (http://wiki.mikrotik.com/wiki/Category:Wireless explained here)
Additional Station Configuration
- Station adapts to wireless access point frequency, despite of the frequency configuration in Wireless menu. Station uses scan-list to select available Access Point, when superchannel mode is used on wireless Access Point, set custom Access Point frequency to mode=station scan-list.
Subscribe to:
Posts (Atom)