Pages

Sunday, November 20, 2011

Get Dynamic IP for Domains

This article is about getting Dynamic IP's for domains such as youtube.com and facebook.com. This is useful when particular task is needed to be done for such domain, tasks such as different route, QoS, prioritization, etc.
The following example will be done for youtube.com and facebook.com. Also that this example assumes that local network IP Subnet is 10.10.0.0/16.

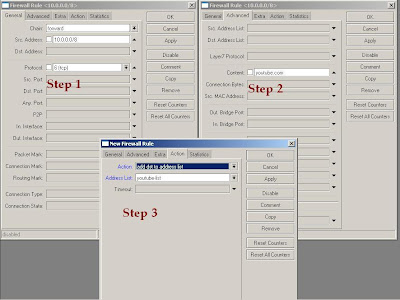
Create firewall rules to add each IP visited by users to a dynamic IP Address-List which can be used later.

/ ip firewall filter add chain=forward action=add-dst-to-address-list protocol=tcp 
src-address=10.10.0.0/16 address-list=youtube-list address-list-timeout=0s 
content=youtube.com comment="youtube.com IPs"
/ ip firewall filter add chain=forward action=add-dst-to-address-list protocol=tcp 
src-address=10.10.0.0/16 address-list=facebook-list address-list-timeout=0s 
content=facebook.com comment="facebook.com IPs"
/ ip firewall filter add chain=forward action=add-dst-to-address-list protocol=tcp 
src-address=10.10.0.0/16 address-list=facebook-list address-list-timeout=0s 
content=fbcdn.net comment="Facebooks content delivery network IPs"


Snapshot of how you will create firewall rules to add each IP visited by users to a dynamic IP Address-List which can be used later.
The same procedure that is shown in snapshot will be followed for content="facebook.com" and content="fbcdn.net", if wanted change address-list to different name such as "facebook-list".
Also make sure that these rules are added in FILTER table and not in MANGLE.

 wiki
Friday, November 4, 2011

AP mikrotik


This article will show a very quick overview for beginners on setting up a Wireless Access Point in RouterOS Winbox graphical configuration tool.
Requirements

a router running RouterOS loaded with supported miniPCI wireless cards
a connection to the router via the Winbox utility

Instructions

Start by opening the Wireless Interface window in Winbox. You will see some wireless cards listed here, they might be disabled - to turn them on, click on the blue Enable button. Make sure that the interface is configured and the antennas are connected before you enable an interface.
To configure an interface, double-click it's name, and the config window will appear. To set the device as an AP, choose "ap bridge" mode. You can also set other things, like the desired band, frequency, SSID (the AP identifier) and the security profile.
You probably want your AP to be secure, so you need to configure WPA2 security. Close the wireless setting window with OK if you are done, and move to the Security Profiles tab of the Wireless interface window. There, make a new profile with the Add button and set desired WPA2 settings. You can choose this new security profile back in the Interface configuration.
To see if any stations are connected to your AP, go to the Registration Table tab in the Wireless Interface window.
Just connecting is probaly not enough, as your AP needs an IP address. This can be configured in the IP menu. Make sure that your stations also have IP addresses from the same subnet, or set up a DHCP server in this Router (not covered in this tutorial).
If your ISP doesn't know about your new local network and hasn't set up proper routes to it, you need to configure SRC-NAT so that your stations have access to the internet via their private IP addresses. They will be masqueraded by the router's NAT functionality (not covered in this tutorial)


Mikrotik - Wireless AP

Instructions

Start by opening the Wireless Interface window in Winbox. You will see some wireless cards listed here, they might be disabled - to turn them on, click on the blue Enable button. Make sure that the interface is configured and the antennas are connected before you enable an interface.
To configure an interface, double-click it's name, and the config window will appear. To set the device as an AP, choose "ap bridge" mode. You can also set other things, like the desired band, frequency, SSID (the AP identifier) and the security profile.
You probably want your AP to be secure, so you need to configure WPA2 security. Close the wireless setting window with OK if you are done, and move to the Security Profiles tab of the Wireless interface window. There, make a new profile with the Add button and set desired WPA2 settings. You can choose this new security profile back in the Interface configuration.
To see if any stations are connected to your AP, go to the Registration Table tab in the Wireless Interface window.
Just connecting is probaly not enough, as your AP needs an IP address. This can be configured in the IP menu. Make sure that your stations also have IP addresses from the same subnet, or set up a DHCP server in this Router (not covered in this tutorial).
If your ISP doesn't know about your new local network and hasn't set up proper routes to it, you need to configure SRC-NAT so that your stations have access to the internet via their private IP addresses. They will be masqueraded by the router's NAT functionality (not covered in this tutorial)


wiki

Mikroti - Wireless AP Client

Configuration example shows how to establish simple wireless network by using MikroTik RouterOS. MikroTik RouterOS is fully compliant with IEEE802.11a/b/g/n standards, MikroTik RouterOS device can be used as wireless access-point and wireless station

Access Point Configuration

  • Connect to the router via Winbox
  • Setup Wireless interface, necessary configuration options are mode=ap-bridge band=ap_operated_band frequency=ap_operated_frequency ssid=network_identification 

  • These settings are enough to establish wireless connection, additionally you need to add IP address for the wireless interface for IP routing, optionally add security and other settings. 

Station Configuration

  • Wireless client configuration example is for MikroTik RouterOS, other vendor OS configuration should be looked in the appropriate documentation/forum/mailing list etc.
  • Connect to the client router via the same way and proceed to the Wireless interface configuration.
  • Necessary configuration options are mode=station band=band_ap_operates_on ssid=ap_network_ssid  

  • These settings are enough to establish wireless connection, additionally you need to set IP address for the wireless interface to establish IP routing communication with access point, optionally use security and other settings. 

Additional Configuration

IP Configuration

  • Add IP address to Access Point router, like 192.168.0.1/24 
  • Add IP address to Client router, address should be from the same subnet like 192.168.0.2/24 

  • Check IP communication by ping from station (for example), 

Additional Access Point Configuration

  • All the necessary settings for the simple Access Point are showed here.
  • Security profiles are used for WPA/WPA2 protection, configuration options are explained here. Usually all wireless clients share the same security configuration as access point.
  • mode=ap-bridge allows 2007 clients, max-station-count is used to limit the number of wireless client per Access Point. Wireless mode=bridge is used for point-to-point wireless links and allows connection for one station only.
  • MikroTik RouterOS license level4 is minimum for mode=ap-bridge
  • Other wireless settings are (http://wiki.mikrotik.com/wiki/Category:Wireless explained here)

Additional Station Configuration

  • Station adapts to wireless access point frequency, despite of the frequency configuration in Wireless menu. Station uses scan-list to select available Access Point, when superchannel mode is used on wireless Access Point, set custom Access Point frequency to mode=station scan-list.

Mikrotik - sytem note

System note feature allows you to assign arbitrary text notes or messages that will be displayed on each login right after banner. For example, you may distribute warnings between system administrators this way, or describe what does that particular router actually do. To configure system note, you may upload a plain text file named sys-note.txt on the router's FTP server, or, additionally, edit the settings in this menu


 example


[admin@RB493G] /system note> edit note 

                           (   )
                          (    )
                           (    )
                          (    )
                            )  )
                           (  (                  /\
                            (_)                 /  \  /\
                    ________[_]________      /\/    \/  \
           /\      /\        ______    \    /   /\/\  /\/\
          /  \    //_\       \    /\    \  /\/\/    \/    \
   /\    / /\/\  //___\       \__/  \    \/
  /  \  /\/    \//_____\       \ |[]|     \
 /\/\/\/       //_______\       \|__|      \
/      \      /XXXXXXXXXX\                  \
        \    /_I_II  I__I_\__________________\
               I_I|  I__I_____[]_|_[]_____I
               I_II  I__I_____[]_|_[]_____I
               I II__I  I     XXXXXXX     I
            ~~~~~"   "~~~~~~~~~~~~~~~~~~~~~~~~

C-c quit C-o save&quit C-u undo C-k cut line C-y paste F5 repaint 


  MMMM    MMMM       KKK                          TTTTTTTTTTT      KKK
  MMM MMMM MMM  III  KKK  KKK  RRRRRR     OOOOOO      TTT     III  KKK  KKK
  MMM  MM  MMM  III  KKKKK     RRR  RRR  OOO  OOO     TTT     III  KKKKK
  MMM      MMM  III  KKK KKK   RRRRRR    OOO  OOO     TTT     III  KKK KKK
  MMM      MMM  III  KKK  KKK  RRR  RRR   OOOOOO      TTT     III  KKK  KKK

  MikroTik RouterOS 5.3 (c) 1999-2011       http://www.mikrotik.com/


                           (   )
                          (    )
                           (    )
                          (    )
                            )  )
                           (  (                  /\
                            (_)                 /  \  /\
                    ________[_]________      /\/    \/  \
           /\      /\        ______    \    /   /\/\  /\/\
          /  \    //_\       \    /\    \  /\/\/    \/    \
   /\    / /\/\  //___\       \__/  \    \/
  /  \  /\/    \//_____\       \ |[]|     \
 /\/\/\/       //_______\       \|__|      \
/      \      /XXXXXXXXXX\                  \
        \    /_I_II  I__I_\__________________\
               I_I|  I__I_____[]_|_[]_____I
               I_II  I__I_____[]_|_[]_____I
               I II__I  I     XXXXXXX     I
            ~~~~~"   "~~~~~~~~~~~~~~~~~~~~~~~~
[admin@RB493G] > 
 

Mikrotik - Hotspot Setup

[admin@MikroTik] /ip hotspot> setup 
Select interface to run HotSpot on 

hotspot interface: ether3
Set HotSpot address for interface 

local address of network: 10.5.50.1/24
masquerade network: yes
Set pool for HotSpot addresses 

address pool of network: 10.5.50.2-10.5.50.254
Select hotspot SSL certificate 

select certificate: none
Select SMTP server 

ip address of smtp server: 0.0.0.0
Setup DNS configuration 

dns servers: 10.1.101.1
DNS name of local hotspot server 

dns name: myhotspot
Create local hotspot user 

name of local hotspot user: admin
password for the user: 
[admin@MikroTik] /ip hotspot>

Mikrotik - User Manager

Introduction

To make this setup, you should have running Hotspot server on the router. Let us consider configuration steps for HotSpot and User Manager routers, in order to use User Manager for HotSpot users.

HotSpot configuration


  • Set HotSpot to use User Manager for HotSpot server users,

 / ip hotspot profile set hsprof1 use-radius=yes

  • Add radius client to consult User Manager for HotSpot service.

 / radius add service=hotspot address=y.y.y.y secret=123456
'secret' is equal to User Manager router secret. 'y.y.y.y' is the User Manager router address. By default this is 127.0.0.1. If using a remotely located Router (perhaps via a VPN) then the IP address entered is the IP address of that remote Router. The router could be a Radius Server, or another ROS with User Manager installed.

  • Note, first local HotSpot database is consulted, then User Manager database.
It means that if you have configuration in '/ ip hotspot user print', users will be able to authenticate in HotSpot using this data.
Delete users configuration from '/ ip hotspot print' to stop using local HotSpot database for authentication. To move batch of local HotSpot users to the User Manager database use export and import . Use text editor program to create appropriate file to import local users to the User Manager database.

User Manager configuration


  • First, you need to download and install User Manager package;
  • Create User Manager subscriber (root customer). Note that when using a version 3.0 or newer, a subscriber called 'admin' is created automatically - you can skip the following stage and change 'MikroTik' to 'admin' in subsequent steps;

/ tool user-manager customer add login="MikroTik" password="qwerty" permissions=owner

  • Add HotSpot router information to router list,

 / tool user-manager router add subscriber=MikroTik ip-address=x.x.x.x shared-secret=123456
'x.x.x.x' is the address of the HotSpot router, 'shared-secret' should match on both User Manager and HotSpot routers. Adding 'x.x.x.x' as a router allows Radius requests from 'x.x.x.x' to be passed to the Radius Server built into User Manager. Therefore if you have any remote ROS Hotspots that require access to this Radius Server, then all their IP addresses must be added to this list.

  • Add HotSpot user information, it is equal to 'ip hotspot user' when local HotSpot is used for clients
In version 3:

 / tool user-manager user add name=demo password=demo subscriber=MikroTik
In version 4:

 / tool user-manager user add name=demo password=demo customer=MikroTik
We discuss only basic configuration example, detailed information about 'user' menu configuration.


  • To make sure, that client is using User Manager for AAA,

 / ip hotspot active print
 Flags: R - radius, B - blocked
  #    USER          ADDRESS         UPTIME       SESSION-TIME-LEFT IDLE-TIMEOUT
  0 R  00:01:29:2... 192.168.100.2   1m29s

MikroTik RouterOS Interface Bonding

I have two separate Metro Ethernet links (via fiber optic) from the datacenter to the NOC. Each link is 10Mbps. I need to utilize both links (bonding) and make sure sure that if one of the links goes down (redundancy), I won’t lose half of my packets. Bonding and redundancy are my goals.
Initially I tried Cisco Catalyst’s EtherChannel feature to accommodate this need since I learned about EtherChannel when I was doing my CNAP. Unfortunately EtherChannel cannot fit in this scenario due to my Metro Ethernet provider’s network setup. They use Cisco Catalyst 3750 switches to aggregate customers links from each POP to their headquarters. My first attempt was to establish trunk mode EtherChannel (802.1q) with Cisco Catalyst 2950 on one side and Cisco Catalyst Express 500 on the other side. Later I noticed that this is not doable since trunking requires MTU size to be larger than 1500 (1504) when my provider strictly limits MTU size to 1500 and negotiation between my 2 switches to establish trunking wouldn’t work since my switches’ BPDU packets are “intercepted” by my provider’s switches. Basically my Cisco switches were trying to establish a VLAN trunk with my provider’s directly connected switches when my switches are  supposed to be negotiating to each other.
I consulted a few experienced people including an employee of the provider, and they told me to use access mode EtherChannel instead of the trunk mode EtherChannel. This is not possible with Cisco Catalyst Express 500, which only offers trunk mode EtherChannel. I bought a Cisco Catalyst 2960 to replace the Cisco Catalyst Express 500 hoping that access mode EtherChannel would work, it didn’t. Even if it did work, it wouldn’t be aware of link state changes since my switches do not connect directly to the fiber cables. There is a fiber-to-ethernet bridge for each side of each link, so my switches will always detect both links as always up as long as the bridges are up.
Since link states cannot be used as a measurement in this scenario, I had to find another way. MikroTik RouterOS offers not only bonding feature, but fail-over mechanism too! The fail-over mechanism uses ARP packets to detect link failures, it is far from perfect but at least it works.
I will add examples later, but for now have a look at this. Hopefully I will discuss EoIP and EoIP over PPTP too.
References:
http://www.mikrotik.com/testdocs/ros/3.0/interface/bonding.php

MikroTik RouterOS — BGP


I have always wanted to learn about BGP. This time I got the honor chance to implement BGP for an ISP. This ISP has its own AS number and a /21 IP address block. This BGP setup is pretty simple because I’m only using 1 PC (with 3 ethernet cards and a MikroTik’s level 4 DOM) to interconnect with an Internet Exchange (IX) — NiCE — and a transit ISP (another transit will be added soon).
In MikroTik RouterOS version 2.9.42, BGP features are available for level 3 and above. You also need to enable routing-test package if you want more flexibility (BGP filtering features). The routing package, as of this version, only allows basic BGP features. I’m sure this will change later when they release RouterOS v3. Once you have enabled routing-test package, you will see new options (Routing – Filters in winbox, or /routing filters on CLI). This is very important when you have to peer with 2 or more ASes (specifically an IX and a transit which is not interested in getting IX’s routes for obvious reasons).
Since I have never configured BGP before, I caused a major problem when routes from each peer goes to another peer when they shouldn’t! I didn’t place any filter for BGP advertisements my BGP router sends to its peers. My transit ISP received the IX’s routes and the IX received full Internet routes feed my BGP router gets from the transit ISP. BGP is an exterior distance-vector routing protocol, it picks its best path by comparing the AS path lengths of every route it has. Advertising the whole Internet BGP feed to the local IX caused other ISPs’ routers participating in the IX to discover a shorter path of international routes going via my BGP router so the routers chose this new shorter path instead and outgoing traffic of these ISPs started to flow via my transit ISP! On the other hand, advertising IX routes to my transit was not a big problem since the path will be farther for their customers anyway, having to go via my BGP router first (that’s one AS further for the transit ISP’s customers to reach the IX routes, so BGP will not select it).
Fortunately I was able to spot the error immediately and placed BGP routing filters to include only my /21 IP block in the advertisements my BGP router sends to both the IX and transit. I also added an incoming BGP filter to discard a default route my transit IP includes in its BGP feed. This default route is not required since I get full BGP feed that is unfiltered.
Useful links:
http://www.mikrotik.com/testdocs/ros/2.9/routing/bgp.php
http://www.mikrotik.com/testdocs/ros/2.9/routing/filter.php
http://wiki.mikrotik.com/wiki/BGP_Case_Studies_1 — Route filters examples
http://wiki.mikrotik.com/wiki/Using_scope_and_target-scope_attributes — Important! Make sure that BGP neighbors are reachable via static routes for dynamic routes to be active (in the case of multihop BGP neighbors)
http://wiki.mikrotik.com/wiki/BGP_soft_reconfiguration_alternatives_in_RouterOS
Cisco’s BGP Reference

PPPoE Server HOWTO for MikroTik RouterOS 2.9


If you wish to run a PPPoE server, MikroTik RouterOS provides a convenient way to set one up in a few minutes (with built-in traffic shaping feature too!). Previously I used Fedora Core for my PPPoE servers, but I couldn’t find a working solution to keep ghost PPPoE sessions from bogging down my Linux server. I tried MikroTik DOM with RouterOS to replace my Linux-powered PPPoE servers, so far the results are very good.

Below is a mini guide that may be able to help you get your PPPoE server running in a few minutes using RouterOS.

First, make sure that your RouterOS server’s WAN connectivity has been properly configured. Remember that you need at least 2 network interface cards (NICs). This guide assumes that both NICs are ethernet — ether1 and ether2. If you haven’t set anything up on the new system, let me help you with the checklist: (based on my experience, the following issues are the most common)

  • Make sure that the Internet-facing NIC has an IP address assigned on it and the default gateway is set (/ip route add gateway=…)
  • If NAT is used, ensure that src-nat/masquerade firewall rule has been added (/ip firewall nat …) and it is working properly

Once you have verified the server’s connectivity, create a PPP profile (/ppp profile add name=”pppoe-profile” local-address=10.1.1.1 dns-server=… rate-limit=128k/128k). Every user account that uses this profile will get 128Kbps upload and download limit. If you wish to have different types of accounts (for example some customers pay for 256Kbps), create a new PPP profile (change the rate-limit attribute).

Next, create a user account assigned to the new PPP profile (/ppp secret add name=”andryan” password=”test” service=pppoe profile=”pppoe-profile” remote-address=10.1.1.2). When this user logs in successfully, this user gets assigned 10.1.1.2. To dynamically assign IP addresses, there is an example here.
Finally, create a PPPoE server instance (/interface pppoe-server server add service-name=”pppoe1″ interface=ether2 one-session-per-host=yes default-profile=”pppoe-profile”) and enable it. Now your RouterOS PPPoE server is ready to answer PPPoE requests and authenticate your PPPoE clients.

Reset MikroTik to default factory configuration


Current MikroTik RouterBOARDs do not have a reset button (if you find a button on your RouterBOARD, it’s not the reset-to-factory-default button) to get it reset to the default factory configuration. User guides for each RouterBOARD, which MikroTik provides on routerboard.com, define the identifier and location of the reset mechanism. Hint: look for a distinct hole on the RouterBOARD and short-circuit it.
I will post some pictures when I get the time chance.
To reset RouterOS to the default configuration, execute the command /system reset-configuration. That should do the job. It will do a backup of the current configuration prior to the reset (how convenient!), in case you change your mind and possibly prevent accidental resets.

Mikrotik - Wiki - Transparent Traffic Shaper

MIKROTIK - PCC


/ ip firewall mangle
add chain=input in-interface=wlan1 action=mark-connection new-connection-mark=wlan1_conn
add chain=input in-interface=wlan2 action=mark-connection new-connection-mark=wlan2_conn


add chain=output connection-mark=wlan1_conn action=mark-routing new-routing-mark=to_wlan1
add chain=output connection-mark=wlan2_conn action=mark-routing new-routing-mark=to_wlan2


add chain=prerouting dst-address=x.x.x.x action=accept in-interface=Local
add chain=prerouting dst-address=y.y.y.y action=accept in-interface=Local


add chain=prerouting dst-address-type=!local in-interface=Local per-connection-classifier=both-addresses:2/0 \
action=mark-connection new-connection-mark=wlan1_conn passthrough=yes
add chain=prerouting dst-address-type=!local in-interface=Local per-connection-classifier=both-addresses:2/1 \
action=mark-connection new-connection-mark=wlan2_conn passthrough=yes


add chain=prerouting connection-mark=wlan1_conn in-interface=Local action=mark-routing new-routing-mark=to_wlan1
add chain=prerouting connection-mark=wlan2_conn in-interface=Local action=mark-routing new-routing-mark=to_wlan2


/ ip route
add dst-address=0.0.0.0/0 gateway=x.x.x.x routing-mark=to_wlan1 check-gateway=ping
add dst-address=0.0.0.0/0 gateway=y.y.y.y routing-mark=to_wlan2 check-gateway=ping
add dst-address=0.0.0.0/0 gateway=x.x.x.x distance=1 check-gateway=ping
add dst-address=0.0.0.0/0 gateway=y.y.y.y distance=2 check-gateway=ping


/ ip firewall nat
add chain=srcnat out-interface=wlan1 action=masquerade
add chain=srcnat out-interface=wlan2 action=masquerade

MIKROTIK - FORWARD IP LOKAL

ip firewall nat add chain=dstnat dst-address=aaa.aaa.aaa.aaa protocol=tcp dst-port=bbbb \
   action=dst-nat to-addresses=xxx.xxx.xxx.xxx to-ports=yyyy
   ip firewall nat add chain=dstnat dst-address=aaa.aaa.aaa.aaa protocol=udp dst-port=bbbb \
   action=dst-nat to-addresses=xxx.xxx.xxx.xxx to-ports=yyyy
 example
/ip firewall nat add chain=dstnat dst-address=69.69.69.69 protocol=tcp dst-port=5900 \
    action=dst-nat to-addresses=192.168.1.101 to-ports=5900

Review Router Wireless RB751U-2HND

Router Wireless RB751U-2HND


Spesifikasi RB751U-2HND
Product CodeRB751U-2HND
ArchitectureMIPS-BE
CPUAR7241 400MHz
Current Monitorno
Main Storage/NAND64MB
RAM32MB
SFP Ports0
LAN Ports5
GigabitNo
Switch Chip1
MiniPCI0
Integrated Wireless1
Wireless Standarts802.11 b/g
Wireless Tx Power30dbm
Integrated AntennaYes
Antenna Gain2 x 2,5dBi
MiniPCIe0
SIM Card SlotsNo
USB1
Power on USBYes
Memory CardsNo
Power Jack8-30V
802.3af SupportNo
POE InputYes
POE OutputNo
Serial PortNo
Voltage MonitorNo
Temperature SensorNo
Dimentions113x138x29mm.
Operating SystemRouterOS
Temperature Range-20C .. +50C
RouterOS License                                           Level 4